Saturday, September 24, 2011

Dress #1

My son got married last week what a wonderful day it was. Along with weddings comes the dreaded question "What do I wear".  Not a thing in my closet would work and I believe me I made sure of that.  I started looking months in advance coming up with nothing.  I have to wear a longer length because my legs are not my strong point, I guess at 54 a girl has to do what she can with what she has, the "its all smoke and mirrors" theory applies here.  I really wanted something pretty with ruffles and flowers like I see all over the net but in my size and covering my knees.  So I thought dare I take the liberty to employ my repurposing talents and create a dress to wear.  My heart cried YES YES if you dream it you can do it........okay that was corny but really anyone who is creative knows that when they most assuredly should be sleeping they become like little elves that make cookies and shoes in the middle of the night while everyone else is sleeping and do their best designing and planning.

I got out my basket of "what if" clothes that I have to use in reconstruction.  It was full of wonderful things I never wear but couldn't get rid of. I ended up making 3 dresses only because when I got started I couldn't stop and also when finished I could try them on as if I were in a department store and make a decision based the look and fit of several dresses.  Today I am featuring the first in the line up. I will post the other 2 and then ask you which one you would have picked and later reveal which one made to the top.  The one I ended up wearing fit like a glove and made me feel like a princess. I don't get out much so that may be a stretch but you girls know when your clothing fits well and you love the style it makes you feel good.

Here is what I started with for dress #1, there was a black dress made out of crinkle knit material, a lace tank top, and a piece of purple knit material I bought somewhere for 50 cents.
The lace tank top was really nice I wore several times but it had issues.  The lace tank kept sliding up leaving too much of the off white tank exposed. I was constantly pulling in down and adjusting it.  Great look bad fit.
The black dress was wonderful but I just never wore it, I just don't get out enough.  And the purple knit I bought because it was just a great color and eye appeal is everything.


First I tried on the tank and while looking in the mirror I placed a staight pin where I wanted to cut off the bottom of the tank to make the dress and cut it to length.  Then I took some of the black lace that I cut off from the tank and made 2 lengths(one wider than the other) to ruffle. I placed one on top of the other and made a running stitch up the middle that I pulled to make it ruffle and pinned it to the front of the left over tank.  I stitched it first by hand then secured it with machine stitiching.  Next I took the purple knit and made my waistband. I pretty much just took the material and put it around my middle to estimate the size of it.  I attached that to the top of the tank with my serger.  The black dress I cut off making it as long as possible cutting it off as close to the top of the dress as possible  to aquire a tea length for the skirt.  I attached the skirt to the waistband and moved on to the embellishments.  I sat at night after work in front ot the tv just playing with roses and more lace.  I really took my time coming up with what I believe makes the dress a finished work of art.  I took the purple knit and made 2 roses by cutting a rectangle about 3" wide and 15" long. I used the twist and roll method of making the rose securing it with hand stitches as I went along.  I hand stitched the roses to the front of the dress that brought my project to completion. I must tell you I had all 3 dresses going at once.  I would work on one then put it down and work on one of the other dresses. I think that sometimes you have to walk away from what you are working until the right inspiration comes along so you can finish. I am very happy with the out come of this dress and I think it is because I took the time to just relax and create.  I wasn't afraid to try something than rip it out and start over till I got it right.


I also took some the left over black lace and made a bow that I tacked on the back of the dress by hand.


I had a wonderful little black sweater cardi that had a lace ruffle I used to top off the dress.  The wedding was outdoors on the lake and I knew that I would need a topper until I hit the dance floor or had a hot flash which ever would come first. Anyway, here is contestant #1. Lace, ruffles, and roses all my favorites and the color purple.........can't get enough!

Life is Good

I went to a sale a few weeks back and all I could afford was a big bunch of fake flowers.  The sale was nice but the prices were out of my comfort zone.  I bought 2 bunches of flowers that I didn't need but they were just so pretty for a dollar I couldn't walk away without them. I put them in my basement (Hoarder's Heaven as I like to call it) until the day would come when they would make their debut.

Yesterday as fate would have it I went to another sale where prices were again not in my range. However sitting all alone by itself in the autumn sun was this wonderful shabby basket , and yes I know it was probably once a cemetery basket but life goes on and it will now celebrate life and happiness. Being that it was marked 2.00 my magic number I just had to have it.  I couldn't believe it the basket was in such great condition and had the metal liner and everything.  I looked at it and thought naw...I don't need that but remembered the beautiful flowers waiting to grace the world with their beauty and knew that fate had brought them together. If you wait long enough you will find a purpose for everything you have stashed away, I promise!

Red Neck Wine Glasses

I was wondering how I could make dinner special for my (adult) kids last Wednesday and remembered a post on the net I saw a while back on Red Neck Wine Glasses (Does Red Neck really have to be capitalized? I better ask Jeff Foxworthy).  Anyways I found this tutorial on making these glasses and knew someday I would have to make some for myself they were hawg heaven! http://kraftingwithk.blogspot.com/2011/04/redneck-wine-glasses.html  Go visit this blog Krafting with K is is really cool and this idea was just the ticket for making my enchilada dinner over the top. 

I had some pint jars in the basement that had been sitting there for about 5 years gathering dust so I brought them up and washed just for the occasion.  I guess since they were Red Neck style I could of skipped this step but I did it anyways, then after they were dry I followed the steps in K's blog.  I added the glass jewels cause I may be a Red Neck but I still like my BLING!


I will tell you Mountain Dew never tasted so good coming from a can.  You can take a Red Neck girl out of the country but don't mess with her sophisticated style.

Friday, September 23, 2011

Blue Heaven

I love blue and robins' egg blue is a real beauty in my opinion.  I found just the perfect shade at the Walmart last week and just had to find something to paint.  I had plans for a while to paint a small cupboard in blue with some birds so I was ready to go.  I painted the cupboard blue, glazed it with a dark brown, and put a coat of poly coat on the top.  I found the cool bird stencils at Hobby Lobby that I used on the sides.


I loved the way the blue turned out on the cupboard so back to the stash to find a table.  I had this sturdy little number I picked up at GoodWill for 5.00 and thought what do I have to loose give it a go something different.  I painted the word "Amore" all over the top to look like subway art.  I guess it came out alright like the color a lot.


Friday, September 16, 2011

Bloom!

Remember the skirt I made a while back when I promised to use the left overs to make a purse. I had the bottom of the skirt and all the rest of the ties left so I sat down and just started to let my imagination go. I wanted more lace on the denim to give the tie flowers a better back round so they would show up. I just happen to find one at the Salvation Army Thrift store for .49 right in my price range! So I cut the denim to size making this bag more of a tote size nice and big to haul anything a girl would need (it's about 15" by 15"!). Next I placed the lace onto the front side and stitched it down. Then while watching the Walton's every night I proceeded to make roses out of the the left over tie pieces. I started with the middle securing it and then kept rolling the tie and twisting it around the forming circle stitching it as I went along. Before long I had a whole garden of flowers and was ready to sew the bag together.


I made 2 handles out of the scraps that I pieced together for one side and used some silky tie looking fabric for the underside from my stash. I also pieced the top band out of tie scraps too. I hand stitched the layers of lace, fringe and trim around the bottom of the top band to embellish it as much as I could, more is always better always! I had a sweet little collage type pin that I placed in the center to give it just a little more pizazz along with 2 vintage buttons.

The purse is fully lined with 2 inside pockets for cells phones and sunglasses, it also has a magnetic closure. Just love magnetic closures they are the best. After the construction was completed I hot glued the roses to the front of the purse and there you have it all finished! I like it so much I have it hanging up in my bedroom to just look at for a while lace and roses are so calming!


Please leave me a comment and tell me what you think! Thanks for stopping by. Next time around I will have 3 dresses I made refashioning some clothes I never wear.  Just a hint there will be lots of ruffles, lace, and flowers!

Sunday, September 11, 2011

Blessed is the Nation


Psalm 33:12   "Blessed is the nation whose God is the LORD"

 
Dear God,
Today I pray for anyone who lost a loved one 10 years ago and for our country as it remembers the day that America turned to You for the strength to endure.  May we not only come to You in times of trouble but as we live out our lives let us look to You for guidance and the courage to stand for what is right.  Help us be  a light to those who have lost their way,  an example to any who don't know the way, and to everyone who is looking to find the way a road map that leads to You.  You told us that You are the WAY to peace, it is just that simple. Thank you for helping us move forward and please continue to heal the hearts of the many who were wounded on September 11, 2001.

In Jesus Name I Pray,
Amen.

French Tote

I had this little wooden tote in my booth for sale for almost a year and it didn't sell so I brought it home and gave it a makeover.  It was painted an ugly brown with spotches of white (probably why it didn't sell, duh!)

I decided to give it a black base coat and then antiuqe white over that.  I used an image from "The Graphics Fairy" and Modge Podged it to the front.  I think it will be a sure sell now!

Vintage Whites


Just a few of my favorite things.  I found all these wonderful things at a garage sale last month and took a day to give them a new look.  The picnic basket was so dreary so I painted it shabby white and painted roses on the top. After a quick amaretto glaze I think it looks perfect for a day in the country.
These wonderful things were all for sale at a yard sale.  I knew the lady and she was so sweet.  She said "if my prices are too high just tell me and I will make you a deal".   I know a good deal when I see one and am smart enough not to let a deal get in the way of good manners.  So often magazines inform people that if they are new to treasure hunting to always ask the seller for a better price.  They also need to say remember your manners and don't insult the seller by asking for a better deal on something that is rock bottom priced to begin with.  Be fair to the seller and they will always welcome you back!  I love the way these things look so gently used.  Painted baskets with a antique glaze are a winner in my book!

Paris Clock

Every time I see a clock at a sale all I can think of is how fast I can put it in my cart and get it home to paint. I found this little gem for 3.00 and knew it would awesome fun.


I painted it with a dark base coat and then the antique white, then a dark glaze.  I used this Paris Subway art design by Kim Klassen and and piece of printed paper as the back round.


I liked the Paris subway are so much I decided to use it on an old roof slate that I had.  I usually paint them but this one had a hole in it from years of weathering.  So I got out the Modge Podge and several designs I printed off from "The Graphics Fairy".   The music paper is actually some vintage sheets from a book I got off the "free" blanket.  That's right it wasn't even a table it was just a blanket tossed on the grass with a paper sign that had the glorious words "Free" written on it. 
God bless those who give joy to others by sharing the things they no longer need.

Free to be Me

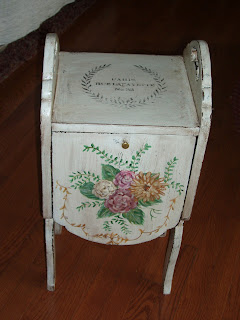
My husband is a builder and was really never into garage sales and dumpster diving until he met me. I have that influence on many I am proud to say.  He is a wonderful guy that never calls me a hoarder or obsessive collector of the unwanted. I know when he may think it sometimes but he is polite enough to only refer to my extensive shoe collection and leaves my overloaded basement out of his conversations with others.  I really appreciate it, I told him today that he can call the TV show"Hoarders"  if he wants but I won't let them in to tape a show if he does. Besides a few weeks back he contributed to my state of affairs by bringing home a really cute little tobacco stand that the women he was working for gave to him for me ( she has seen my work and endorses my habit!). It was in pretty good shape one of the legs needed to be repaired but that was about all so I set out to give it a makeover.
I undercoated the piece with flat black and then painted it with olde white. 


I found my graphics on "The Graphic Fairy" I used a combination of the wreath with the Paris graphic to get this design.  You just print them out and cut them to fit. Next tape them together and print them out as one design.  I did use the reverse image feature to print them out so I could transfer the image to the top using Citra Solv (My new crush).

This piece came out looking old and distressed just the way I like it! I couldn't picture a world without old junque.

Nostalgia

The key to good day in my workshop is having a well stocked store room full of things just waiting to become something lovely.  My last adventure in the design room proved to be such a delight I could hardly contain my joy, not only did I put together several projects but I also finally learned how to do image transfers with Citra Solv.  My first attempts were not successful and it took me over a week of experimenting and watching You Tube videos to get the hang of it. It was well worth it and I am sure that with more practice mastering this process it will become a real asset.

This is what I started with, I had this little table I bought as GW and an old drawer and door that I knew would be a real nice combination. I put the drawer on top of the table attached it with a little Gorilla Glue and screws.  Then I set the door panel onto the top of the box and put a set of hinges on the back to make it like a treasure chest on legs.  I painted it with an undercoat of black brown and let it set out in the sun to dry.   After the glue and undercoating dried I gave it a coat of olde white.  I found a great design on "http://upcyclingmylife.blogspot.com/2011/07/little-nova-scotia-rocking-chair.html .  Deborah is such a talent woman and I hope you check out her wonderful blog it is awesome! Thank you for the free graphic I love it and hope to use it again!  I  printed it out in the reverse image mode on a laser printer so I could transfer it to my treasure chest table.
After several attempts I finally got the image to transfer using the Citra Solve method.  I painted some poly coat onto the side with image so it would not smear when I went to apply the glaze.  The glaze is a dark brown with just a hint of black in it.


I really like the way the image transfer worked out,  I almost gave up on using it but with a little hard work and a prayer it all worked out just like I imagined it would.