Showing posts with label funiture. Show all posts

Monday, May 25, 2015

Unique Hand Made Tables

 
ENJOY THE RIDE TABLE-This table started out with 2 bicycle rims and 2 boards from my stash.  I added some big old castors that I got from a junk shop to make it roll. If you are going to "enjoy the ride" then you better be able to roll! I hand painted the top and stenciled the bottom.


My son brought 2 cable spools home from work for me to play with.
 
 
I painted them up and added castors to the bottom.


In this picture you can see that I attached some jute to the middle to make it look like a spool of twine.
 
This table started out with two bi-fold doors. I originally bought them to make a clothing rack but decided against it because they were way to tall.  Left with my 8.00 investment I let them sit for a couple of months and then decided they would make a great couch table. You know the kind that you put behind your couch to display cool stuff on.  I uses some old table legs and some castors on the bottom so you could move it around easily.  I hand painted the designs on the top of the table.


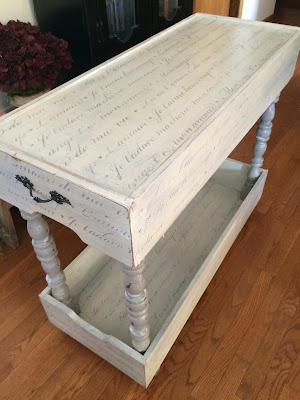
This is one of my favorite tables.  It was made from 2 large drawers I found at the Re-Store.  I added some large spindles and once again some castors and came up with this table.  I even added some hooks on the end for towels or utensils or kid's jackets. Whatever! I painted it shabby white and stenciled it with a French script stencil.


______________________________________________________________________-
I can't even believe I made this table, but I did.  When I say I made it I mean it. I design my creations and then put them together myself.  This one I made from a large drawer and 2 auto creepers that are used to scoot under a car when you are fixing it.  The wheels roll very nicely.  I used some old table legs to connect the 2 parts and an old baby bed spring for the back. I hand painted the design on the front and added the floral swag.  I forgot to take pictures of it so the lady who bought it was kind enough to email these two pictures.  I think she did a great job taking the picture it reminds me of something out of a "Romantic Home" magazine!


Garden Table, Collector's Sign and Shabby Bookshelf

This sign is one I have in the front window of my booth.  I had made one using this saying a while back and thought this would be a great advertisement for incoming traffic at the Antique Store where my things are for sale.  I used an old frame with a piece of thin ply wood inserted to paint the sign on.  It is a big sign and you can't miss it when you walk by the front window.


__________________________________________________________
I made this garden table from 2 door panels several spindles and 2 shutters.  The top piece is a rescued piece of window trim from an old farm house that was taken down.  I painted the panels on the shutters as chalk boards and hand painted the design on the table top. I had some rusty fencing that I used to fill in, in between the shutters.  You can clip notes and pictures to it.  I love to make garden tables and make them I think on the average of every 3 months or so.  I am in the process of finishing one now, so look for it down the road.

_____________________________________________________________
 
 
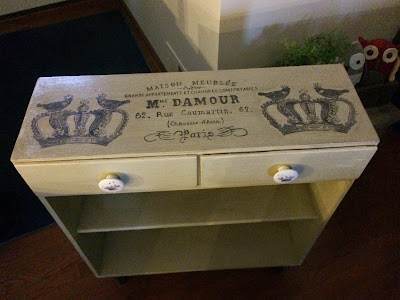
This piece is a book shelf I found at a resale shop.  I really liked it because it has the two drawers on the top.  It needed a little fixing but was in relatively good condition when I bought it.  It was a bright red and I wondered how many coats it would take to cover the red, turns out it took only one good base primer and two coats of regular off white. 


I used the Modge Podge method to transfer the designs to the top of the book case and even put crowns on the knobs using that method.  It came out better than I expected and sold right away.


Tuesday, January 28, 2014

Reconstructed Furniture and Accent Pieces

This piece started out with the top portion that I bought at an estate sale.  It was made by a man I know when he was a lad in shop class. I just liked the design and knew it was meant for greatness.  I used some spindles for the legs and added a bottom shelf. It still needed more so I added the vintage wire basket to serve as a catch all for all the things that need stashing.


This piece started out with a shutter and then I found the bottom table and attached the two.  I added the door I found in my door collection that fit perfect without any adjustment.  I also added the design piece on the top that was from a broken vintage picture frame. 


 Here are some stools I found at a storage unit sale.  They are originally from Ikea and the fifty dollar price tag was still on them. They were really beat up and needed some love. I thought I would just clean them up and re-stain them but it just didn't work out so I painted them up instead.


I wanted to post some of the smaller accent pieces I have made.  I usually try to make several things to go with each piece of furniture that I make. I just makes a nice display and who doesn't like a little eye candy now and then?
 
Here is a wooden box I simply painted blue and stenciled on a design. It went from ugly stain to shabby loveliness in just minutes.
 This angel was gold and even though she was cute she needed a shabby make over so I spray painted her white and painted her with a brown glaze to make her look old.
I bought several of these plinth blocks at the flea market last summer...oh how I can't wait to go to a flea market again...don't get me started!  But anyway I got them and decided they would make nice picture holders.  I have three more I am still working on, this one is already sold! yeah!
 

 I found this pretty lady head and just had to have her. I wasn't in love with the way she was painted but I loved her expression. I gave her a coat of white spray paint and use a brown glaze on her to soften her appearance and there you have it! She is a beautiful shabby lady.
 
 This wonderful bowl was painted an awful blue and had some chips I had to repair.  I dare say you can't find the repair job it came out so good I was very happy with the outcome. I painted this bowl with primer by hand and then a coat of white with brown glaze. I wanted a more uneven finish so it would look worn with love.


 I bought this bird because I liked the shape, it was a very terrible brown color but I saw the potential for it to be wonderful. I primed it and then painted it black. When that dried I painted it sparingly with white. So when you see something you love don't let it get away because you don't like the color you can paint almost anything you set your mind to and give it new life.  I saw a magazine the other day at the grocery store that claimed that same thing, "How to Paint Anything!" Believe it it's true!