Showing posts with label makeover. Show all posts

Monday, May 25, 2015

Garden Table, Collector's Sign and Shabby Bookshelf

This sign is one I have in the front window of my booth.  I had made one using this saying a while back and thought this would be a great advertisement for incoming traffic at the Antique Store where my things are for sale.  I used an old frame with a piece of thin ply wood inserted to paint the sign on.  It is a big sign and you can't miss it when you walk by the front window.


__________________________________________________________
I made this garden table from 2 door panels several spindles and 2 shutters.  The top piece is a rescued piece of window trim from an old farm house that was taken down.  I painted the panels on the shutters as chalk boards and hand painted the design on the table top. I had some rusty fencing that I used to fill in, in between the shutters.  You can clip notes and pictures to it.  I love to make garden tables and make them I think on the average of every 3 months or so.  I am in the process of finishing one now, so look for it down the road.

_____________________________________________________________
 
 
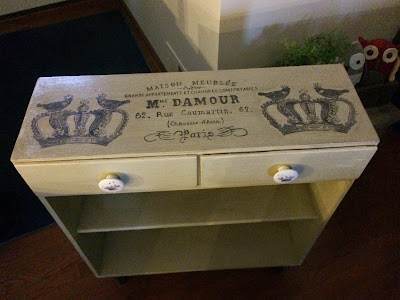
This piece is a book shelf I found at a resale shop.  I really liked it because it has the two drawers on the top.  It needed a little fixing but was in relatively good condition when I bought it.  It was a bright red and I wondered how many coats it would take to cover the red, turns out it took only one good base primer and two coats of regular off white. 


I used the Modge Podge method to transfer the designs to the top of the book case and even put crowns on the knobs using that method.  It came out better than I expected and sold right away.


What I do to pass the time!

 
 This is a wood piece I salvaged from a piece of furniture trim.  I mounted a clip that was used to hold band music.  I love vintage photographs so it was a no-brainer what I would use this for.  I painted it shabby grey and stained it as usual. 
 I had this chair back for several years and one day thought hmmmmmm......I need to do something with this cool old piece.  I went to the stash pile and found an old drawer from a sewing machine cabinet and mounted it onto the chair back.  It needed some gluing and nailing but in the end proved to be the perfect match for the chair back.

I liked this piece so much I kept it and hung it in my bathroom.  I found the old red and white runner that I hung from one of the back slats.  
Bought this metal dress form at TJ Max for .75  Painted it grey and transferred the Paris design using the Modge Podge method.  Then I glued a round wood piece to a wood candle stick and teamed them to make this vignette. Add a candle and floral candle ring and this piece is complete. 

 
I always buy potato bins when I see them.  I have several in my house that I use for storing dog food and potatoes.  This one I painted grey and stenciled the design on it. It sold pretty quickly so I guess other people like the bins as much as I do.


I got one of these clothing racks that you see at garage sales all the time. I think I paid about 2.00 for mine.  I took the top hanger off and the middle piece that was for holding cuff links and tie tacks.  Then I mounted an old cupboard door on it and made this free standing chalkboard out of it. It was a very simple project and sold right away.  They were going to use it for their business writing messages to promote sales.


I'm Back!

It's about time I got back to my blog and posted some stuff. I have very good reason that I have not posted anything for such a long time. My Mother had cancer surgery and my Dear Husband had heart surgery.  It has been a very busy chaotic time but God is good He brought us through this hard time and we praise Him for it.

I had to stop painting for about 2 months but financially it was necessary to get back to work and contribute to our situation I am going to post in this segment all the small miscellaneous things that I worked on with a small amount of explanation. I think it is more important to provide visual inspiration than ramble on about each piece.


This is a letter holder I found and painted. It is just a simple project that anyone could do really. A little white paint and a simple bird image I painted on free style. 

This sign was made from a top of an old picnic basket.  I found the basket top at a sale and thought it would make a lovely sign. As I post more things you will see that I have been taken up with sign making lately. I love the challenge of painting them and they make such a statement piece. 

Below is a handmade wooden box I picked up and painted.  I got the design off from "The Graphics Fairy" and traced it on the top and painted it up.  I made it shabby by sanding and staining it before I top coated it with Min Wax water base poly coat.


This is a sweet tray I found and painted the middle with chalk paint. I love chalkboards and make them often as you will see in future posts.  This one was a real heavy tray and I loved the handles on the side.  There is always a use for things I believe....I guess that is why my basement looks like an episode of Hoarders. Not really that bad, I can only work so fast and work my day job. Maybe someday I will be able to make a living doing what I love again, a girl can dream!

Sunday, May 5, 2013

Painted Bliss

I love old crates and tables. Put the 2 together and it doesn't get any better!  This one I added a door panel for a top and then hand painted it.  I wish I had room to keep all the box tables I make but then I wouldn't have any money to buy more boxes to paint! lol.......


This is a little round table I bought for 2.00  I painted it white and grey and painted a clock design on it.  Recently the shop I am in closed and I am deciding whether or not to continue to paint, I can't imagine a world where I can't make things.

 This picture contains several things I painted to sell and that are already sold in the shabby chic theme.  The stool swivels, it had fabric on the top of it at one time.  I am always a happy girl when I strip the fabric off from a piece and there is a paintable surface underneath.  The wooden tote had wax all over it. I think someone filled it with candles and let them burn down in it. I had to scrap and sand it like mad but I got it off and painted it up.  The watering can is missing its spout and it was dented so I bent it back into shape and paint it.  It would be great with flowers in it.
Second chances are the best, I am always grateful for the ones I get!

Wednesday, February 6, 2013

Mega Drawer turned Table


When you walk to a yard sale be sure you can carry home your purchases.  With this in mind I was able to buy this giant size drawer and carry it back to where I was staying.  It came out of the local old  hardware in downtown Tustin which excited me even more since my parents bought their house from the owner of the hardware some thirty years ago.  It had history not just a pretty face but a pretty past as well it doesn't get any better than that.  I scooped it up for a mere 5.00 and made my way home with my treasure one happy girl. I thought of all the wonderful things I could do with this fabulous drawer and decided above all else I would not tamper with the green paint on the front , it is showing up a little brighter than it really is but assuredly it is a delightful green. 


I love the old drawer pulls they are metal and have a sweet design on them. I added the legs to the sides using a set of old oak legs I bought at an antique shop years ago. Once again the hoarder principle works despite what the scoffers say that you will only think of a use for it after you get rid of it. Not so, I have proven them wrong time and time again and case in point another project finished due to the fact I had just the right accessories.
 I painted the top and stenciled with a saying I found on Pinterest that I have been meaning to use since I first saw it.  I thought it was perfect for this piece because what I do love about my home is who I share it with because first they love me and second they accept me for who I am a little insanity never hurt anyone.

Wednesday, October 10, 2012

Patchwork Chair Rescue

Last summer I was lucky enough to pick 3 Parsons chairs off a free pile.  One was unrepairable and the other 2 needed work but I felt they would be a fun project.  The chair was stained and dirty so I cleaned it up and painted the under body with a coat of fresh paint. I painted the legs grey and then a coat of black.

 I took off the original chair cover, ripped it apart and used it for a pattern. I found a vintage wool quilt that was sitting in my sewing room and decided that it would be cool to make a new chair cover from it.
                             I like the back flaps and way the cover fit the chair and the muliti-colors.
I think I still should make a small accent pillow to sit on the chair to finish it off.